

ATS Fail to Switch Power Sources: Causes & Troubleshooting Steps
ATS Fail to Switch Power Sources: Causes & Troubleshooting Steps
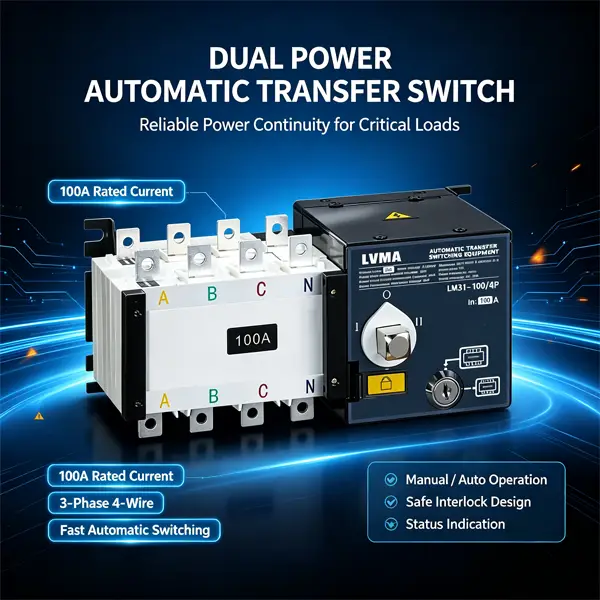
An automatic transfer switch (ATS) is a critical component for uninterrupted power supply in commercial buildings, industrial facilities, data centers and residential backup power systems. Its core function is to automatically switch between the main utility power and backup generator power during outages.
If your ATS fails to switch power sources properly, it will lead to power interruption, equipment downtime and even potential electrical safety hazards. This article summarizes the most frequent causes of ATS switching failures and provides a practical, field-proven troubleshooting workflow for electricians, maintenance engineers and facility managers.
1. Common Symptoms of ATS Switching Failure
Before troubleshooting, confirm typical abnormal performances to locate faults efficiently:
- No response when main power cuts off; ATS stays on the utility side
- ATS delays switching to backup power for several seconds or longer
- The switch tries to transfer but bounces back immediately
- Indicator lights show abnormal status while switching
- Manual mode works normally, but automatic mode cannot complete transfer
2. Main Causes for ATS Failing to Switch Power Sources
2.1 Power Supply & Voltage Detection Faults
ATS relies on built-in voltage sensors to monitor main and backup power. Once detection fails, the transfer action will not trigger.
- Main power undervoltage/phase loss: Sensors cannot identify power outage signals
- Backup generator fails to reach rated voltage and frequency
- Loose or oxidized wiring on voltage detection terminals
- Damaged voltage sensing modules inside the ATS controller
2.2 Controller & Control Circuit Malfunctions
The controller is the brain of an ATS. Circuit damage or parameter errors will disable automatic switching:
- Incorrect transfer delay time settings
- Tripped internal control circuit breakers or blown fuses
- Damaged control board, burnt circuits or faulty relays
- Poor communication between controller and execution components
2.3 Mechanical & Contact Defects
Mechanical wear and contact burnout are common faults after long-term operation:
- Stuck mechanical interlock or switching actuator
- Burned, oxidized or loose main contact points
- Fatigued springs that cannot drive the switch mechanism
- Foreign objects blocking the moving parts inside the switch cabinet
2.4 Wiring & Installation Issues
Improper wiring and poor installation directly affect normal transfer:
- Wrong phase sequence connection between main power and backup power
- Loose cables at incoming and outgoing terminals
- Water ingress, dust accumulation or moisture causing short circuits
- Incorrect earthing leading to electromagnetic interference
3. Step-by-Step Troubleshooting & Repair Guide
Follow this standard procedure from safety check to final testing. Cut off all power before any inspection and repair work.
Step 1: Safety Preparation & Basic Status Check
- Isolate main power, backup generator power and all load circuits. Lock out and tag the device to prevent accidental power-on.
- Observe indicator lights on the ATS panel: Record alarm codes or abnormal light status for further analysis.
- Test manual transfer mode: If manual switching works well, the fault is mainly in control circuits or sensors; if manual mode also fails, focus on mechanical structures.
Step 2: Inspect Power Sources and Voltage Signals
- Use a multimeter to measure voltage, frequency and phase sequence of main utility power. Confirm if there is actual power loss or phase failure.
- Start the backup generator and verify its output meets the ATS rated parameters.
- Check all detection circuit wiring: Retighten loose terminals and clean oxidized connectors.
Step 3: Troubleshoot Controller and Control Circuits
- Check small fuses and miniature circuit breakers for the control loop. Replace blown fuses with matched specifications.
- Access the controller menu to verify transfer delay, threshold voltage and protection parameters. Restore factory settings if parameters are disordered.
- Inspect internal relays and the main control board. Replace burnt or non-responsive modules.
Step 4: Check Mechanical Structure and Contacts
- Open the ATS cabinet and remove dust and foreign debris inside.
- Manually operate the switch mechanism to check for jamming. Lubricate movable parts if stuck.
- Examine main conductive contacts: Clean slight oxidation with sandpaper. Replace severely burned contacts directly.
- Check mechanical interlocks to ensure they work flexibly and reliably.
Step 5: Recheck Wiring and Environment
- Reconfirm phase sequence of main power and backup power to avoid phase mismatch.
- Check cabinet sealing: Repair damaged waterproof strips to stop water and dust ingress.
- Reinforce all cable terminals and ensure reliable earthing connection.
Step 6: Power On and Full Function Test
- Restore power step by step according to safety rules.
- Simulate main power outage to test automatic transfer function.
- Simulate power recovery to test re-transfer back to utility power.
- Repeat 2–3 cycles to confirm the ATS works stably without repeated faults.
4. Daily Maintenance to Prevent ATS Switching Failures
Regular maintenance can greatly reduce failure rates and extend service life:
- Conduct quarterly visual inspection on wiring, contacts and indicator lights
- Clean dust and moisture inside the ATS cabinet every 6 months
- Test automatic transfer function monthly with load simulation
- Retighten all electrical terminals once a year to prevent loose connection
- Check generator linkage and control parameters regularly
Conclusion
ATS failure to switch power sources is mostly caused by abnormal power detection, faulty controllers, mechanical wear or wiring problems. By following the above troubleshooting steps, most on-site faults can be resolved efficiently. Stick to routine maintenance to keep your automatic transfer switch running reliably and protect your power supply system all the time.
Share This Article
Follow Us
An automatic transfer switch (ATS) is a critical component for uninterrupted power supply in commercial buildings, industrial facilities, data centers and residential backup power systems. Its core function is to automatically switch between the main utility power and backup generator power during outages.
If your ATS fails to switch power sources properly, it will lead to power interruption, equipment downtime and even potential electrical safety hazards. This article summarizes the most frequent causes of ATS switching failures and provides a practical, field-proven troubleshooting workflow for electricians, maintenance engineers and facility managers.
1. Common Symptoms of ATS Switching Failure
Before troubleshooting, confirm typical abnormal performances to locate faults efficiently:
- No response when main power cuts off; ATS stays on the utility side
- ATS delays switching to backup power for several seconds or longer
- The switch tries to transfer but bounces back immediately
- Indicator lights show abnormal status while switching
- Manual mode works normally, but automatic mode cannot complete transfer
2. Main Causes for ATS Failing to Switch Power Sources
2.1 Power Supply & Voltage Detection Faults
ATS relies on built-in voltage sensors to monitor main and backup power. Once detection fails, the transfer action will not trigger.
- Main power undervoltage/phase loss: Sensors cannot identify power outage signals
- Backup generator fails to reach rated voltage and frequency
- Loose or oxidized wiring on voltage detection terminals
- Damaged voltage sensing modules inside the ATS controller
2.2 Controller & Control Circuit Malfunctions
The controller is the brain of an ATS. Circuit damage or parameter errors will disable automatic switching:
- Incorrect transfer delay time settings
- Tripped internal control circuit breakers or blown fuses
- Damaged control board, burnt circuits or faulty relays
- Poor communication between controller and execution components
2.3 Mechanical & Contact Defects
Mechanical wear and contact burnout are common faults after long-term operation:
- Stuck mechanical interlock or switching actuator
- Burned, oxidized or loose main contact points
- Fatigued springs that cannot drive the switch mechanism
- Foreign objects blocking the moving parts inside the switch cabinet
2.4 Wiring & Installation Issues
Improper wiring and poor installation directly affect normal transfer:
- Wrong phase sequence connection between main power and backup power
- Loose cables at incoming and outgoing terminals
- Water ingress, dust accumulation or moisture causing short circuits
- Incorrect earthing leading to electromagnetic interference
3. Step-by-Step Troubleshooting & Repair Guide
Follow this standard procedure from safety check to final testing. Cut off all power before any inspection and repair work.
Step 1: Safety Preparation & Basic Status Check
- Isolate main power, backup generator power and all load circuits. Lock out and tag the device to prevent accidental power-on.
- Observe indicator lights on the ATS panel: Record alarm codes or abnormal light status for further analysis.
- Test manual transfer mode: If manual switching works well, the fault is mainly in control circuits or sensors; if manual mode also fails, focus on mechanical structures.
Step 2: Inspect Power Sources and Voltage Signals
- Use a multimeter to measure voltage, frequency and phase sequence of main utility power. Confirm if there is actual power loss or phase failure.
- Start the backup generator and verify its output meets the ATS rated parameters.
- Check all detection circuit wiring: Retighten loose terminals and clean oxidized connectors.
Step 3: Troubleshoot Controller and Control Circuits
- Check small fuses and miniature circuit breakers for the control loop. Replace blown fuses with matched specifications.
- Access the controller menu to verify transfer delay, threshold voltage and protection parameters. Restore factory settings if parameters are disordered.
- Inspect internal relays and the main control board. Replace burnt or non-responsive modules.
Step 4: Check Mechanical Structure and Contacts
- Open the ATS cabinet and remove dust and foreign debris inside.
- Manually operate the switch mechanism to check for jamming. Lubricate movable parts if stuck.
- Examine main conductive contacts: Clean slight oxidation with sandpaper. Replace severely burned contacts directly.
- Check mechanical interlocks to ensure they work flexibly and reliably.
Step 5: Recheck Wiring and Environment
- Reconfirm phase sequence of main power and backup power to avoid phase mismatch.
- Check cabinet sealing: Repair damaged waterproof strips to stop water and dust ingress.
- Reinforce all cable terminals and ensure reliable earthing connection.
Step 6: Power On and Full Function Test
- Restore power step by step according to safety rules.
- Simulate main power outage to test automatic transfer function.
- Simulate power recovery to test re-transfer back to utility power.
- Repeat 2–3 cycles to confirm the ATS works stably without repeated faults.
4. Daily Maintenance to Prevent ATS Switching Failures
Regular maintenance can greatly reduce failure rates and extend service life:
- Conduct quarterly visual inspection on wiring, contacts and indicator lights
- Clean dust and moisture inside the ATS cabinet every 6 months
- Test automatic transfer function monthly with load simulation
- Retighten all electrical terminals once a year to prevent loose connection
- Check generator linkage and control parameters regularly
Conclusion
ATS failure to switch power sources is mostly caused by abnormal power detection, faulty controllers, mechanical wear or wiring problems. By following the above troubleshooting steps, most on-site faults can be resolved efficiently. Stick to routine maintenance to keep your automatic transfer switch running reliably and protect your power supply system all the time.
Contact Us
Related Blog




Contact Us
Have questions about our products or services? Our team is here to help you with any inquiries.